Quote

Black Lives Matter

Friday 19 April 2024

Whales themed cushion

I made a large cushion for the sofa. It uses panels from a rather flimsy cotton bag from Whale and Dolphin Conservation and some fabric in a whale print.

I interfaced the main graphic panel and added blue textured flanging and then the whale print fabric.

I took 4 small scatter cushion inners (originally on a sofa) and reused all the feathers in a new inner. I did this out in the garage with the main door open and wearing a mask and it was a very messy business!
For the back I used some plain blue fabric and added a button closure.

Monday 15 April 2024

Fabric Box (without interfacing)

There are lots of fabric box patterns out there, most of which start by ironing interfacing onto the back of the fabric. Alison of Acorn Cottage Artistry suggested this blog post  for a basket made without using interfacing. It has pockets which you can slide pieces of card into.

The resulting box is about 6 inches wide and 5 inches tall

I made mine all from the same fabric, but it would lend itself to a contrast for the lining and could be a great scrap buster.

Thanks for the link Alison.


Friday 12 April 2024

Emerald Green - ideas for bringing in a specific colour to your wardrobe - Part 3 : Fabric Markers

Emerald Green - ideas for bringing in a specific colour to your wardrobe - Part 3 : Fabric Markers

I had some viscose (rayon) jersey fabric which had been languishing in the stash for many years. It was a bright white background with a fairly sparse outline print of palm trees in black. I don't much like achromatic looks (no colour) so hadn't reached for it.


To add colour I coloured in each of the palm leaves by hand with a green Dylon fabric marker. It took several hours and completed used up the marker.

If I try this again I'll cut the pieces out first, then colour the motifs in.

The pattern I used is Simplicity 1945 which has been in my stash for more than 10 years (it was issued in 2011). I made View B, the mock wrap top with a full round back alteration, full bicep alteration and extra width through the body.


I made a high round back alteration, full bicep alteration and graded out a little at the sides. I also cut the band across the fabric and a bit wider and used it as a neckband rather than a facing. I used my coverhem machine on the hems.

The pattern goes together nicely but I think I'd need to make more alterations for it to be flattering on my body.

I had hoped that the ruching would give me a waist. Unfortunately it hits lower on me than expected and is not very flattering. Perhaps I added too much ease or maybe its just the wrong shape for my body.


I'm going to see if my full busted friend would like this top.

Thursday 4 April 2024

Emerald Green - ideas for bringing in a specific colour to your wardrobe - Part 2 : Use a Print

 Emerald Green - ideas for bringing in a specific colour to your wardrobe - Part 2 : Use a Print

the green in the smaller leaves works very well with the emerald colour


New Look 6735 (modified for fit) in a cotton lyra jersey from Fabrique Creations in Skegness.

There are lots of other colour in this print too so it should be a versatile piece in my wardrobe

Wednesday 3 April 2024

Emerald Green - ideas for bringing in a specific colour to your wardrobe - Part 1

Emerald Green - ideas for bringing in a specific colour to your wardrobe - Part 1 : Planning

(This turned into such a long post as I was writing it that I think it'll be a series!)

I like to co-ordinate to some extent, which I'm sure isn't a surprise to you if you've seen all the capsule wardrobes I've sewn!

A while back I attended a dance based exercise class and bought some trainers (sneakers) on sale which I only wore in the studio. I don't go to that class anymore, so the shoes are now available for general wear and now its spring I'd like to wear them a bit more without investing lots of money in new items.


The colour is infuriating, greener than turquoise/teal but lighter and bluer than most of the greens.

I've been collecting ideas and will see how many of them I can put into action. I thought this might be useful for others, so let me know if you found it helpful!

Step 1 - Clothes and accessories you already own

Go through your wardrobe and accessories and see what you already own in this colour. I didn't think I had anything much but found I did have a few things. Don't forget scarves and jewellery. 


Earrings


two necklaces


A t shirt (sadly with 4 tiny stains which I can't get out, prob splashes of sauce)


Multicoloured tube scarf

I can happily make outfits with these pieces to wear my green trainers now.

Step 2 - Fabric and craft materials you already own

Now go through your fabric and scraps and pull out anything matching or containing the colour (including scraps of quilting cotton too small to be a garment). I also picked out thread, buttons, trim, beads, fabric paint and silk paints.

NOTE: If there is a similar (but not matching) colour in a print it may still work as its less critical that the colour be an exact match.

Step 3 - Ideas for using what you have

1. Use a print. Sew a garment from a print fabric which includes your colour (or something similar).

2. Embroidery. By hand or machine. Add a motif in the colour to a plain garment (or to fabric and make up into a garment)

3. Fabric paint. Mix several colours together to match the colour you are introducing. Keep it simply by painting a stripe. The base can be plain or striped already - overpaint a few of the white stripes.

4. Sew beads in your colour onto the neckline of a top.

5. Add a contrasting patch pocket to a top, you can use quilting cotton for this.

6. Add applique (quilting cotton again) to a garment (use with caution!)

7. Make a garment using the colour for the cuffs and neckband

8. Make a colour blocked garment which incorporates plains and print with at least one mention of the chosen colour.

I am going to try as many of these as possible and will share the results as I go!

Tuesday 2 April 2024

Sewing Machine Covers

I've made soft covers for the machines which I most commonly leave out on my sewing table.

These are just to protect them from dust

There would not normally be 4! though perhaps 2 or 3


CoverPro - this is my Janome CoverPro 100CP, with the damaged thread spools removed (I just use freestanding ones)

MyLock, this is my old NewHome MyLock 134D overlocker from the 1990s

Queenie, this is my main sewing machine a Janome 4300 QDC

Nina, this is my Bernina 800DL overlocker.


The covers are made from an old curtain, I then stitched on embroidered name patches so I know which cover goes on which machine (they are roughly shaped to fit).

I did the lettering on my Janome Memory Craft 200E embroidery machine. I didn't make a cover for this one as it normally lives in the cupboard and just comes out for embroidery projects.

I also have a backup sewing machine (older Janome) and a vintage Singer, but these both have hard cases and live in a cupboard anyway.


Tuesday 19 March 2024

Sewing goodies from Home Bargains

 In the UK we have a number of discount stores, one of them being Home Bargains.

I've not visited one for a while, so when I did I picked up a few things very inexpensively from their sewing/craft section.


I'm not sure what level of quality the items will be but they will be interesting to try.

Left: bendy plastic ruler marked in inches and with holes in it meaning it can be used to draw circles.

Top: Minatare sewing kit (not great quality) £1.89, sewing machine needles 89p

Middle: 3 x 30cm (12 inch)  black zips 79p , Glass headed pins 99p, storage label clips (to use with sewing pattern boxes) £1.99

Bottom: embroidery scissors 99p

Right: Fabric marking pencils - one white, one blue 99p

Monday 18 March 2024

Trying a free bear pattern

As people know I sew, I thought the day might come when I'd be asked to make a memory bear. In order to be ready for this I decided to try making a bear out of quilting cotton with a free pattern. I've learned a lot but this wouldn't be a pattern I'd use again, and I'm going to take it apart and reuse the stuffing and what I can of the pieces.


Here's a link to the How Joyful Bear sewing pattern and tutorial

How to make a stuffed bear: The HowJoyful Bear

It's really lovely of Joy to provide the bear pattern for free, and I appreciate that. However my bear does have a number of problems, some from the pattern some of my own making.

Fabric: 

The successful bears I've seen using this pattern all use something soft and with some volume like fleece, french terry etc, I used quilting cotton as being similar to clothing which I would use for a memory bear. As it was quite flimsy I interfaced all the pieces with iron on interfacing. (I managed to use only scraps as the pieces are not that large, so that was a real win).

The original bears used a low contrast colour combo - cream and pink or cream and pale brown. Although my quilting cottons go well together the paisley is too dark which makes the nose area in particular very visually dominant.

Size: 

The pattern is for a one size only bear. Its a sitting bear about 17" tall (to top of ears). This was a lot bigger than I'd wanted to make and used a very large amount of stuffing.

Shape: 

The belly sticks out rather more pointily than I think looks good, and smoother less pronounced curve would look better.

The head is a rather odd shape, very wide at the bottom and with a very pronounced muzzle, though I'm not sure what would be a good size/shape. The head also seems a bit big for the accompanying body.

Instructions:

When Joy originally shared the pattern, she described in very general terms how to put the bear together. Later she went back and wrote more detailed step by step instructions which are interwoven with the original text and pictures. This is slightly confusing to follow.

The instructions refer to numbered pattern pieces, but the print out doesn't have these numbers. I tried to match up the names of the pieces to add the numbers after I'd printed it out. This was only partially successful and I mixed up two similarly named pieces.

The pattern includes letters at various points which are used to help match the pieces up. These are generally pretty helpful. Unfortunately there are a couple of mistakes which meant I had some unpicking to do and some moments of great confusion. The front legs have the letters the wrong way round so they don't match up later on, this was fixed by unpicking and resewing. There is also a wrong letter somewhere in the shoulder area which really confused me.

Following a blog post I had read, I stitched some fabric onto the back of the muzzle area to keep the stuffing in place.

If you follow the instructions, much of the head is sewn on by hand, fine for a decorative bear but unlikely to hold up with a child. I changed it round, leaving the rear seat open and stitching the head to the body by machine. I also left one side unsewn, and then sewed up the seat.

The pattern does not include seam allowances. I added 1/4" onto the paper pattern as I'm not used to adding the seam allowances by eye. I wasn't clear when sewing the bear up which seams to sew all the way to the edge of the seam allowance and which to stop at the stitching line. Consequently I had to unpick some short sections and sadly also have some small gaps at intersections (front neck, front leg join)

I made eyes from 3 circles of felt - white, brown and black - and stitched them on by hand. I didn't embroider a nose/mouth as I wasn't sure how well the black thread would show against the navy paisley fabric. The bow covers the hole at the front neck.

Conclusion:

I won't be using this pattern again, and I shall take this bear apart to reclaim the materials used!

Thursday 14 March 2024

Holiday Purchases

I've been away for a few days to Boston in Lincolnshire, England, which is less than 2 hours away.

It was cold and windy but we managed to see the coast at the beach and the marsh as well as a National Trust property and exploring locally. 

Happily one of the other Sewing Place members lived nearby so we had a chance to meet up for a walk on the beach, lunch, a trip to a fabric shop then a peek at her sewing room. A fabulous day.

This is the jersey I bought from Fabrique Creations in Skegness with J.
£1 spools of overlocker thread from Westlands Sewing in Boston.
Sewing pattern and elastic thread from the St Barnabas Hospice Shop

Tuesday 5 March 2024

Aqua print top

 At the end of last year I made some polo neck top (turtleneck tops) including one in this lovely aqua print.

I only had enough left for the front, sleeves and neckband of another top. As this was a cotton elastane knit it wouldn't have worked to use a softer and drapier rayon/viscose for the back, so I hunted about in my fabric resources until I found something with similar heft (but unknown fibre content).

I still have some small strips of the fabric left, so you may see it appear again in future, though only as neckband, cuff or pocket!


Saturday 2 March 2024

Floral Top


I want to embrace Spring but its still quite cold, so this polo neck top (turtleneck) is a great solution. Bright and cheery but with a snuggly neck and long sleeves.


It's made from my usual TNT pattern OOP New Look 6008 where I've altered the sleeve for a full bicep and the back piece for a high round back. 

Thursday 29 February 2024

Striped Tee for a friend

This is the Closet Core T-shirt with the full bust front and the cropped length. I made it for my friend C.


There was a bit of fabric left, so she'll get that back to play with (she's learning to sew, but has a busy full time job)


Wednesday 28 February 2024

Ivory Top

I seem to make a new ivory/cream top every year as they seem to shrink or get stained.


This is made from a pattern I created by tracing off a RTW top


For this version I added a sight V at the front neck by stitching a little line on the band from behind.

Saturday 24 February 2024

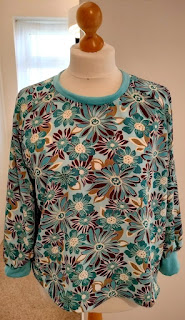
Remy Raglan adapted

This is the Remy Raglan pattern with the full sleeve add on, but then instead of the woven cuffs and bias neckline I've cut jersey bands, copying something I saw in the Whitcomb Top.


It is an experiment, that I don't think has quite worked, what do you think?


Wednesday 21 February 2024

Metra Blazer in a Printed Ponte


I've made another Metra blazer, this time in a printed ponte knit.


For this version I made the shawl collar version as I felt that shape was more in keeping with the swirls of the stylised floral print on the fabric.

I kept the full bicep alteration and did a high round back alteration of 1 inch.

When I wore it out for lunch with a friend I wore it with blue jeans (Itch to Stitch Mountain View) and a plain aqua turtleneck (poloneck). It worked well.

I think plain coloured versions would be more versatile, but I'm trying to sew from stash and this was a suitable weight.